For organizers
Manage signups and the waitlist
By Tim Sullivan Updated
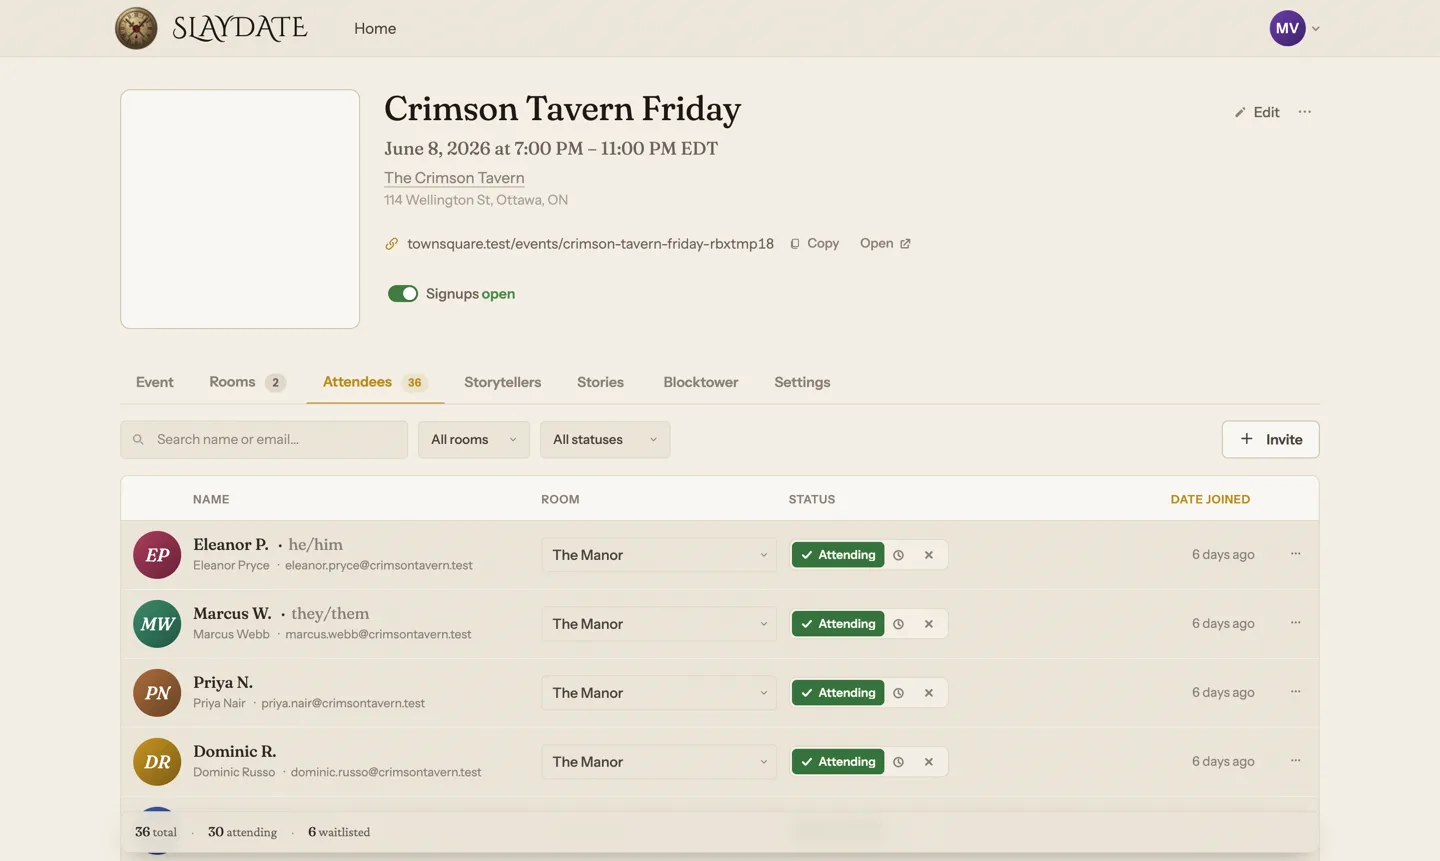
Once people start signing up, the Attendees tab is where you run the show. It's the roster for the whole event: who's got a seat, who's waiting, and which room they're in.
Here's how to read it, move people around, and keep the waitlist honest. We'll use the demo event, Crimson Tavern Friday, as the running example: two rooms (The Manor and The Cellar), 15 seats each, 30 seated and 6 on the waitlist.
Open the Attendees tab
From the event management hub, click Attendees in the tab bar. This is your roster for every room at once. You don't switch tables to see everyone.
Each row shows a player's name and pronouns, their email, which room they're in, their status, and how long ago they joined. The whole list is sorted by date joined, so the order roughly tracks who got in line first.

Read who's seated and who's waiting
Status is the thing to watch. Each row has a three-way control: Attending, Waitlisted, Not attending. Attending means they have a seat. Waitlisted means they're in line.
The tally at the bottom keeps the running count (total, attending, waitlisted, and not attending if anyone's declined). Right beside it, a per-room meter: The Manor 15/15, The Cellar 15/15. If you ever push a room past its seats, that number turns red so you can't miss it.
Promote someone off the waitlist
Find the waitlisted player (search by name or email, or set the status filter to Waitlisted to see just the 6 waiting). Flip their status to Attending.
Note that a room being full doesn't stop you. The signup mode gates self-serve players at the door, but you can hand-assign past capacity. That's when the red over-capacity count earns its keep. If you're seating into a full Manor, bump someone to The Cellar or back to the waitlist to make room.
Changes don't save as you click. Hit Save when you're done. Or Save and notify to save and email everyone whose seat or room changed.
Move a player between rooms
Every row has a room dropdown (it's hidden on single-room events, since there's nothing to pick). Switch a player from The Manor to The Cellar right there. Good for balancing newer players toward Trouble Brewing and the bolder crowd toward Sects and Violets.
To move a batch at once, click a player's avatar to select the row. A bulk toolbar appears with Change room and Change status dropdowns that apply to everyone selected. Same deal: it's not saved until you hit Save.
Know what the emails do
Save and notify is the only button that emails anyone. Plain Save is silent, which is what you want while you're shuffling people around and not ready to tell them yet.
Slaydate picks the right message per person based on what actually changed: a confirmation when you seat someone off the waitlist, a heads-up if you bump a seated player back to the waitlist, and a room-change note if you moved an already-seated player. Nobody gets pinged twice for the same state.
To change the wording players see when they get a seat, open the Settings tab and click the Acceptance email row. It shows Default or Custom, and opens an editor where you can write your own. Leave it on Default if the standard message is fine.
Open or close signups
The Signups toggle lives on the event header, up top in the hub. Flip it off and the public signup page stops taking new people. Flip it on to reopen.
This is separate from the roster. Closing signups doesn't touch anyone already on the list, and you can still seat, move, and waitlist people in the Attendees tab while the door is shut to the public.
That's the loop: read the roster, promote off the waitlist, balance the rooms, then Save (quietly) or Save and notify (with emails). For Crimson Tavern Friday, that means keeping both rooms at 15 and working through the 6 waiting whenever a seat opens up.
One habit worth keeping: only hit Save and notify once you're happy with the whole batch, so players get one clean email instead of three as you think out loud.